Healthy Homemade Whole Wheat Pizza
May 30, 2011, Updated May 20, 2020
There’s really nothing quite so amazing — and perhaps even life-changing (world-changing!) — as fresh, homemade bread, just out of the oven… Except maybe for one thing: Fresh, homemade pizza!
Considering the work-to-reward ratio of homemade pizza, I’m amazed that more people aren’t doing it. You don’t need any special equipment (though there are a few gadgets that do make it easier), and — if you use whole wheat flour and don’t go overboard on the cheese — it can be a healthful, inexpensive, and outrageously satisfying meal. Kids of all ages (self included) simply love it! (Hint: Add a side salad).
A little over a year ago, we discovered Healthy Bread in Five Minutes a Day. We eagerly followed their unique directions for “100% Whole Wheat Bread, Plain and Simple,” with a surprising degree of success.
Since then, Matty has become the one in charge of making the dough (I’m usually still in front of the computer; he just gives up and starts without me), and lately he’s been experimenting with some flavorful additions (we both looooove caraway seeds). Turns out, that very same bread dough makes a terrific pizza crust — and you don’t even have to give it time to rise!
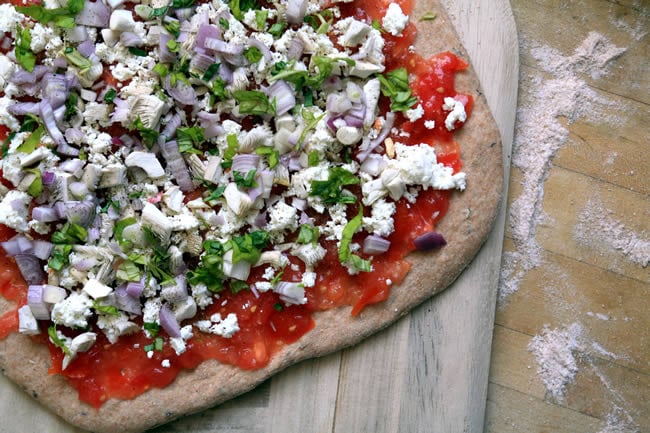
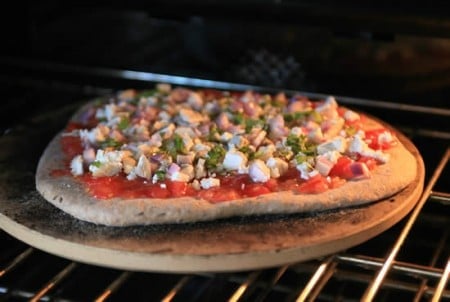
To me, pizza is kind of like soup. It’s one of those comfort foods that’s hard to mess up (though I’ve botched both before), and you can toss in/on whatever ingredients you have on hand. When making the pizza pictured here, for example, we realized the only suitable cheese we had in stock was chevre. Turned out beautifully. So use the recipe below as a guide, and use the sauce, toppings, and/or cheese you (or your kids) see fit.
Before I get to the recipe, I want to share some morsels we’ve learned:
You don’t need to buy marinara or pizza sauce. Most store-bought tomato sauces are loaded with far too much salt, and they’re expensive. We have been buying cans of organic, diced tomatoes (low-salt) by the case (thanks, Costco!)… you can simply open a can and spoon it on, or you can use an immersion blender (or food processor) to purée it into a smooth sauce. Sprinkle on some basil, oregano, and pepper, and you’re in business. (For the pizza shown here, we just took two fresh tomatoes and puréed them lightly in a food processor.)
You don’t need a lot of cheese. This crust has a rich, nutty flavor. Going easy on the cheese allows the flavors of the crust and toppings to shine through. It’s a lot less expensive, too.
If you use fresh herbs, it’s usually better to put them under the cheese — otherwise they may overcook.
If you use fresh garlic, it’s usually better to put it on top to be sure it cooks fully — else it will overpower everything else.
Having a pizza stone helps, but isn’t necessary (Use instead: Baking sheet). We use this excellent pizza stone. I bought the 14″, but wish I had the 16″. Measure your oven first to make sure it’ll fit.
Having a pizza peel helps, but isn’t necessary. (Use instead: A second baking sheet or large cutting board.)
Give your oven a full 30 minutes to warm up, and be sure your baking stone or baking sheet is in the oven when you start preheating. You want the surface to be hot when you add the pizza to the oven.
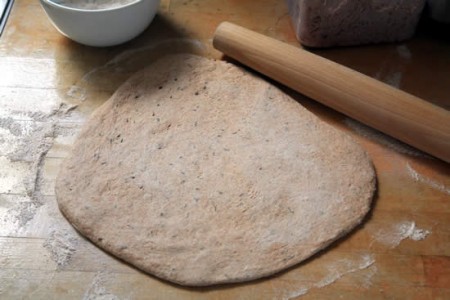
Use lots of flour when rolling the dough. This dough is fairly wet, and it gets very sticky. Keep your hands, rolling pin, and pizza peel coated with flour.
Crank your oven all the way up (500°F or even 550°F), but be sure you don’t accidentally turn it to “broil.” (Boy, was that a bummer…)
Roll out the dough on the counter, but place it on the floured pizza peel before adding toppings. Moving it onto the peel once the toppings are on will result in topping bits just about everywhere but on your pizza. Once the rolled out dough is moved to the peel, work quickly to add the sauce and toppings. Otherwise, the dough will get sticky again and cling to the pizza peel. If that happens, don’t stress: Lift up a corner of the pizza with a spatula, sprinkle some more flour under it, and carefully work your way around until the pizza is un-stuck and slides easily again.

Healthy Homemade Whole Wheat Pizza
Ingredients
- 3 1/2 cups white whole wheat flour
- 1/8 cup vital wheat gluten, or an extra 1/8 cup flour
- 1 packet yeast, or 3/4 tablespoon
- 1 tablespoon garlic powder
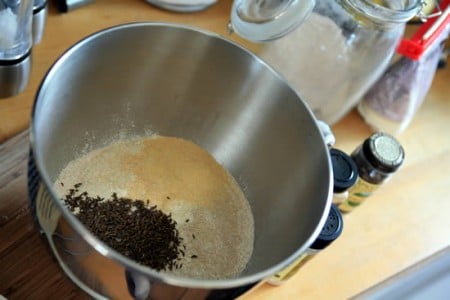
- 1 tablespoon caraway seeds
- 1 tablespoon onion salt
- 1 3/4 cups warm water
- 2 teaspoons extra virgin olive oil
Instructions
- Place your pizza stone or a baking sheet in the middle rack of the oven, and preheat to 500°F or 550°F, for at least 25 minutes. (Be careful not to accidentally turn it to "Broil" mode.)

- Add all dry ingredients to a mixing bowl. If you have a stand mixer, use a paddle or dough hook. If mixing by hand, a wooden spoon should suffice. While mixing slowly, slowly pour in the warm water and olive oil. The dough should mix to a sticky, gooey consistency, but not be runny. Adjust with a little more flour or water as necessary.
- Scrape dough into a large container and allow to rise for 15 to 60 minutes. (If you don't want to wait, you certainly don't have to!) We use this time to prep and chop all our toppings, so they're ready to go as soon as the dough is rolled out.
- Sprinkle a liberal amount of flour on a clean counter top and on your hands. Tear off a chunk of dough about the size of a softball. If you're already an advanced pizza maker, and can toss the dough, by all means go for it. Instead, here's what I do: Form it into a ball and then place on the floured surface. Using a rolling pin (or wine bottle, in a pinch), roll the dough into a 12" round(ish) shape. It doesn't have to be a perfect circle, but it is a little easier to get in and out of the oven if it's somewhat round.
- Sprinkle more flour on a pizza peel, and spread it around to be sure it's an even layer. Transfer the rolled dough to the peel. Spoon tomato (or other) sauce onto the dough, then add whatever cheese and toppings you wish.
- Gently shake the peel forward and back to be sure the pizza slides easily. If not, use a spatula to un-stick it and sprinkle some extra flour underneath. This is important -- you don't want your pizza to end up as a blob of dough and toppings at the bottom of your oven as you try to slide it onto the pizza stone.
- Gently transfer the pizza to the hot pizza stone, coaxing the back edge of the pizza off the peel and onto the back section of the stone. Carefully pull the pizza peel back towards you, jiggling as necessary, to place the entire pizza on the stone.
- Bake for 12 minutes, then carefully check for doneness. The center should not be soggy, and the bottom should be crispy all the way across. If not done, bake a few minutes longer and check again.

- Use the peel to carefully lift the pizza off the stone. Allow to cool for a couple of minutes, then transfer to a cutting board. Slice and enjoy!

Nutrition


i sugest when it rises, to wait at least 25-60 minutes, not 15-60
Use corn meal and lightly cover your pizza peel to keep dough from sticking while building your pizza….it also adds a little crunch underneath. Don’t add herbs until it comes out of the oven….
This looks excellent! Sadly I have stopped buying my organic tomatoes at Costco due to the Del Monte brand containing a lot of BPA. I am on a search for a reasonably priced BPA free organic tomato now!
The hardest part is the “reasonably priced!” I think the tomatoes we were getting at Costco were actually Muir Glen — but I don’t remember for sure, and I’m due for another trip to the store. If memory services, the Muir Glen Organics are in BPA-Free cans — but don’t hold me to that. Good luck — and let us know what you find!
I’ve done them where I made my own pesto sauce and used that as a pizza sauce.
Great idea!
Hmm… our basil plants are doing really well (ever since I figured out they need to be watered every day). Could be time for some pesto…
Your pizza looks fantastic! So glad you are enjoying the dough and I love all the tasty bits you have added to it!
Cheers, Zoë
Thanks, Zoë!
Anytime anyone says they are thinking about baking bread for the first time, I immediately and enthusiastically recommend Healthy Bread in Five. It’s a great place to start — and then some.
We’re changing the world, one loaf at a time! 😉
I adore the recipes in Zoe’s book, but haven’t tried using this recipe as a pizza crust yet. That will be next on the agenda. Great suggestion about puree the organic diced tomatoes for a sauce.
Hey Dara! Yup, it works really well as a pizza crust — and it’s especially nice that it doesn’t really need time to rise (if you want a “breadier” crust, just rolling it thicker is usually enough, though letting it rise a little helps, too).
Let me know how it goes for you!
so glad you posted this. I have whole wheat pizza dough in the fridge from trader joe’s and I’ve been wanting to make it! Thanks for the no need for pizza sauce idea! A couple of tomatoes is way cheaper than a jar of pizza sauce!
Yay! Let me know how it turns out. Depending on the tomatoes, they can be pretty watery. You may want to cook them down (simmer for a few minutes to remove some of the liquid — which is also a good time to add your seasonings!), or if in a hurry, just strain them a little in a fine-mesh strainer (or cheesecloth).
Then again, we didn’t do that on the pizza in the pics above, and it turned out just fine. 😉
We have whole wheat crust pizza every Friday night, a nice way to ease into the weekend. Our pizza stone and peel were a good investment…I cannot imagine eating pizza other than homemade!
I think whole wheat pizza every Friday night is a FANTASTIC weekend ritual! (I just need to remember to make more next time, so we’ll have leftovers for Saturday morning….)
I absolutely agree, nothing better than fresh homemade bread AND fresh homemade pizza dough!
this looks wonderful – Jason is the pizza and bread maker in our house, and we like to grill it on the outside grill – yum! I had a pizza stone until it recently broke (and it was SO perfectly seasoned!) and I am missing it!
happy Monday!
I haven’t yet tried grilled pizza… sounds fantastic! Then again, my grill is pretty crappy, so it’ll probably overcook half the pizza and leave the rest a gooey mess. 😉
Thanks for the great tips. I have a pizza stone but not a peel. I couldn’t quite picture how it would slide off the peel, but you described it well. I usually assemble the toppings after putting the dough onto the stone, which makes the oven lose too much heat and the stone cools down. Guess I need to purchase a peel. D’ough!
Yes, preheating the stone with the oven is essential! It also means that the stone will heat up slower (rather than just putting it in a 500 degree oven in one fell swoop), so I think it’ll be less likely to crack.
Also, keeping the stone on the bottom rack when you’re baking other items helps keep a more consistent temperature in the even…
The peel is definitely helpful, but not necessary by any means. A thin cookie sheet will do the job just fine.
If you are looking to buy one, keep an eye on how thick or thin it is. Mine’s pretty thick (maybe 3/8″?) so it’s sometimes hard to get under things to slide them out. I probably would buy a metal one next time…