Six Reasons to Ferment your own Food (and How to Make Fermented Dilly Beans)
Last Updated September 25, 2017 · First Published October 18, 2012
![]() Austin Durant is a software entrepreneur/computer geek by trade and a fermenter/food geek by choice. He started fermenting after reading about the benefits of fermented foods in an article by the Weston A. Price Foundation. The benefits were obvious to him – it’s nutritious, economical, and easy. He wanted to add the “community” aspect, so he started Fermenters Club as a way to spread the word and to teach others how to make and share fermented foods with their friends. Austin lives in San Diego’s North Park neighborhood, which is ground zero for the local slow food movement. You can find the Fermenters Club on Facebook, Twitter, Pinterest, and YouTube.
Austin Durant is a software entrepreneur/computer geek by trade and a fermenter/food geek by choice. He started fermenting after reading about the benefits of fermented foods in an article by the Weston A. Price Foundation. The benefits were obvious to him – it’s nutritious, economical, and easy. He wanted to add the “community” aspect, so he started Fermenters Club as a way to spread the word and to teach others how to make and share fermented foods with their friends. Austin lives in San Diego’s North Park neighborhood, which is ground zero for the local slow food movement. You can find the Fermenters Club on Facebook, Twitter, Pinterest, and YouTube.

I was delighted to be asked to contribute to the October Unprocessed movement! While fermentation is technically a form of “processing,” it’s nothing like the modern techniques that are used to extrude, pasteurize, deconstruct, re-construct, strip down or otherwise adulterate natural ingredients. Instead, it enriches food, using age-old techniques, and nothing more than salt and a little help from our (trillions of) microbial friends.
What is Fermentation?
Fermentation was discovered as a way to preserve foods beyond their harvest season, and was developed thousands of years before refrigeration and other modern technologies existed. There are many definitions, but as it relates to food preservation, fermentation is a technique that encourages the growth of “good” bacteria while keeping out dangerous bacteria and molds.

Why Ferment?
1. It’s Healthy
Fermented foods are the original probiotics. The living bacteria involved in the fermentation process create enzymes and add vitamins to the food. They promote a healthy digestive system by supplementing and assisting the good bacteria in our gut flora (the trillions of symbiotic bacteria that live in our digestive system.) And scientific studies are proving that these beneficial bacteria do a lot to keep us healthy!
2. It’s Delicious
All ferments are pickled, but not all pickles are fermented! Almost all pickles you find at the grocery store are “quick-pickled” using vinegar. Compared to quick-pickling, the flavors in fermented foods are much more complex, allowing flavors more time to develop naturally. Devotees describe the difference in flavor between quick-pickled and slow-fermented foods as a comparison between a $2 bottle of hooch versus a 40-year old Bordeaux.

3. It’s “Green”
Fermenting food requires no special equipment and no electricity. You can start with just a few basic ingredients, with items you probably already have in your kitchen: a wide-mouthed plastic or glass container, a plate, a dish towel, and kosher or sea salt.
4. It’s Economical
Eating fermented foods is one of the least expensive and most natural ways to eat healthy. You can save money when fermenting by buying seasonal produce that’s at the end of its growing season, when it’s most abundant, and when farmers and grocers lower their prices to sell it before it goes bad. Plus you’ll also save money because once you start eating fermented foods, you won’t have to buy probiotic pills!
We recommend using seasonal (when a food is most abundant), organic (pesticide residues can slow or halt the growth of good bacteria), and locally grown (smaller carbon footprint, and tastes better!) foods whenever possible.

5. It’s Easy
Most initial preparations take about 15 minutes. During the fermentation period (which can be from 3 days to 6 months or more), some basic cleaning and maintenance is recommended to ensure that your ferments stay free of surface mold. As Tom Petty put it, “The waiting is the hardest part!
6. It’s Fun
Fermenting and sharing fermented foods with our friends and neighbors helps bring communities together, and connects us to our ancestors who used these techniques for millennia!

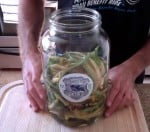
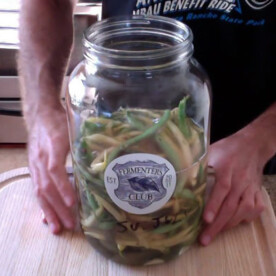
Fermented Garlic Dilly Beans
This video is 4:23 and shows the entire 13-day process, with updated progress every few days, as well as tips on keeping your ferment clean along the way.
Fermented Dilly Beans
Ingredients
- 1 1/2 lbs. whole fresh string beans, any variety
- 1 1/2 quarts/liters filtered water
- 6-8 fresh dill sprigs
- 3 garlic cloves, or up to 8 if you REALLY LOVE garlic
- 4 Tbsp. sea salt
- 1 tsp. peppercorns
- 1/4 cup pickle brine, from previous batch
- 1 fruit leaf, grape, cherry, apple, oak, etc.
Instructions
- Make Brine: Mix 3 Tbsp. sea salt to 1 quart of water. Stir until dissolved.
- Peel garlic cloves.
- Add beans, garlic, dill sprig leaves (remove from stems) in layers into gallon-sized jar or crock.
- Pour brine over vegetables up to 1 inch below the top of the vegetables (they will settle).
- Add flexible lid and weight on top of veggies so they are completely submerged.
- Cover with dish or tea towel & secure with twine or rubber band.
- Put in coolest part of house or kitchen.
- Check every few days. Scrape, spoon or wipe out any mold that forms on top.
- Taste a bean starting after 5 days. When it has texture and taste you like, move to refrigerator. There they will keep for months (if they last that long!)


I am concerned about the mold and why your jars are showing so much of it. My husband has just started fermenting foods, but we do not have any mold showing. Since I am allergic to almost every kind of mold I would be very skeptical about having any of it. Could it be that because you are reusing a brine that you have more? Or is there any way we can prevent it?
Ronna,
If you are concerned about mold, you can purchase “airlock” systems to ferment. They keep most of the air out (where mold spores come from) while letting the carbon dioxide from the fermentation process escape. I would recommend something like that for you if you are especially sensitive to molds. Check out http://www.pickl-it.com/ for example.
(NOTE: I have not used them myself, so this is not an endorsement, but just FYI).
The video was shot in early summer, and it was warm, which always means more mold (and faster fermenting) than when it’s cooler.
Thanks for demystifying fermentation! I have been lacto-fermenting veggies for years using a bit of whey & salt. I very recently learned that the whey is actually optional, as long as I use salt & keep the veggies submerged. Your suggestion about using a leaf for crispness is great, too. Can’t wait to try it! Also, I’ve never weighted the veggies– just covered with the water/salt/whey to within 1/2 inch of the top, then sealed with a lid. Works fine, but what does the weight do? Should I be using a weight?
Hi Mollie,
Yes, whey is optional, and it’s “fine under the brine”! If your veggies are submerged without using a weight, then you don’t need it. But it is important to keep the veggies under the brine, where airborne molds cannot reach them.
However, I would caution about sealing the lid on any fermentation that’s longer than 3 days. Fermentation creates carbon dioxide (CO2), which can build up pressure in your container. That’s why I use the “open air” method and just clean out the surface mold.
There are air lock systems you can buy (or make yourself) which keep fresh air out and allow CO2 to escape.
You can also use liquid whey (which is the liquid-y part of yogurt) as an optional kickstarter. This is NOT THE SAME AS WHEY POWDER, which is a highly processed industrial by-product that doesn’t contain any living bacteria.
Hi Folks!
The last two ingredients (brine and a fruit leaf) are optional. The brine just gives a ‘kickstart’ to the fermentation process, but if you are using quality (organic) ingredients, there is enough bacteria already present on the vegetables for it to work (as Sandy points out).
The fruit leaf has tannins in it which are known to keep the veggies crispier than without. However I have had good luck without a leaf (again use freshest ingredients possible!)
So if you haven’t done this before what would you use for the 1/4 cup of brine?
I’ve also just started fermenting; I’ve done cucumber, zucchini, carrot and jicama to a brine of 1 tsp. pickling (no additives – just SALT) salt per cup of water. That may not be enough salt, according to this, but they fizzed up and (apparently) developed their lactic acid just fine – at least, neither I nor my husband have had any adverse digestive reaction to them! I’ve also seen recommendations to add a little whey drained off of plain yogurt, as a “starter.”
P.S. – OTOH, it’s nice to know I _can_ re-use some of the brine. I do have some weeds in the driveway that could use some natural discouragement, but that could get to be quite a bit of salt water to risk getting into the garden, if I really take off with this!
Sorry if I missed this in the article but what if I don’t have a previous batch of pickle brine to use? How do I make it?
These looks good but I don’t have either the brine from a previous batch or access to a fruit tree. Will it work without those?
This sounds great! My husband just strung a whole mess of green beans yesterday. Problem though, he slipped them in freezer bags and consequently the freezer. Can we pull these and do this same recipe without too much ado?
Also, once they reach refrigerator stable – how do you eat dilly beans? Cold or Hot?
Ceri,
Hmm that’s a good question. If they’ve been frozen then it’s possible that the good bacteria have died off. Try thawing them back to room temperature and giving it a try. In your case I would especially recommend used brine or liquid whey (see my other comments below); that may be enough to re-start the fermentation.
I like to eat them cold, like dill cukes. If you heat any fermented good too much (above 140F) then it kills the probiotics!
My pleasure, Cheryl! The site has lots of fermented recipes to get you going, and liking us on facebook and signing up for our newsletter are two other ways to stay in the loop. Happy fermenting!
Thanks, Austin! I really must learn more about this!